
I know, I know.... February is nearly half way through......
Please be patient...
I'm having major tech problems with Blogger at the moment....
I'm in contact with Blogger, so it shouldn't be much longer before things are back to normal.
I am already working on the post for March, but it's proving difficult until Blogger fixes some big glitches.
Summer February 2013
I'ts been a few weeks now, but I'd like to draw your attention to a dear old pal of mine....and pay my respect to my lovely dog Jedda.
Sadly; Jedda passed away in January in our yard. He was a good mate and will always be remembered.
Jedda joined our family over 16 years ago, so he knew our pack well. After-all, we had Jedda for almost as long as we've had our children. It's sad that he is gone, but knowing that he has no pain now and can run freely; brings comfort to my family.
I'd like to say a huge thank-you to Joe and her off-sider Sarah for helping me with Jedda's passing. Joe and her off-sider Sarah are our local vet; but also true friends (from garden class). Thank-you Joe and Sarah for helping my family and myself through such a sad time. For nothing but the best for your pets; check out The Kembla Grange Vet Clinic.
Lots of tears were shed and good memories spoke of too.....Thanks again Joe & Sarah; you guys are truly awesome.

*********************************
Summer is finally here! It’s so nice to feel the heat, but if you ever wondered if your garden suffers from the heat; you bet it does. Big Time!
When you are trying to retain moisture in your garden, you need to concentrate on your supply of MULCH! I can’t stress how important it is to have your garden mulched; especially in the heat of summer. When laying good mulch, it’s also important to think about the thickness of the mulch, when to water and whether to use wetting agents or not.
When it comes to my garden; my main concern is laying the correct mulch on each type of garden. (We will discuss this later) I always try to achieve a thickness of at least 100mm with each garden; but 100mm is fine.
As you are all aware; my classes are always a month ahead of themselves so you have time to prepare and plan ahead. That's why; this month I spent New Year's Day typing up the class notes......
*********************************
To start the year off, I'd first like to give a big warm welcome to new and existing garden members.
*********************************
February is the month when we need to think about preparing our vegetable garden beds for winter.
Write down in your Garden Diary which summer crops are nearly finished, and which seeds or seedlings you are planning to plant and where. Give yourself time to gather your seeds, be it from friends, your own stock, or even the Wollongong Wholesale Nursery at Albion Park Rail.
We still have a few weeks of summer growth left, so don't pull up those plants just yet. The weather is now preparing for Autumn which we will talk about next month; when the changeover of seasons begins in March.
I love my Blog....I'm hoping it will prove very successful this year, so please encourage your friends to follow along too....If you are one of my students, tell at least five friends how much you get from attending my classes ....AND please tell them about my blog.
 |
| Blooming Gardens blog with Richard Moran |
Richards top 10 Jobs to do this month
1. Look out for powdery mildew on your cucurbit crops. (zuchini, cucumber etc)
1. Look out for powdery mildew on your cucurbit crops. (zuchini, cucumber etc)
2. Dead head your hydrangea’s by pruning any old spent flower heads
3. Think about what you would like to plant for your winter vegie bed and write down a list
4. Fertilize your roses
5. Top dress your lawn and add some fertilizer.

7. Tidy your herb beds by cutting them back....(try drying some of those clippings from your herbs)
8. Don’t forget you should still be using liquid fertilizer fortnightly on your vegies. Keep an eye out for how to make your own liquid fertiliser straight from your garden. (coming soon)
9. Look at propagating some plants from cuttings.
10. Make sure you have your garden diary handy at all times.
*********************************
Annuals and potted colour
We can still plant a few annuals, like begonia’s and marigolds but really its all about colour this month.
Have a walk around your garden and send me some photos of what’s flowering in your garden.
Here are just a few photos from my garden as I walk around there is so mulch colour and I just don’t know where to start.


Vegie guide for temperate regions in Australia
(taken from Gardenate Website)
 Look at those vegies and how perfect are his carrots? Well done David!

David’s native bee set up. Which I will be discussing in the next class.


I love to give mine away, as I said mine came from a good friend. If you cannot get a plant; try growing from a shoot purchased from your local vegie market. Beware though, this method takes much longer to start.
What ginger has to offer you?
Re-creating their natural habitat is the best way to attract frogs (toads are good too) and keep them from wandering off in search of more frog-friendly surroundings. Keep in mind, if you live in an area or climate where frogs are not often seen, the chances of attracting frogs is obviously slim. However, in these areas, bringing in frogs is not likely to work either, because frogs do not naturally thrive in those conditions.
How to Attract Frogs

Water lilies in a sunny position provide cover and help discourage marauding birds and algae blooms. Swamp plants can be grown bare-rooted, held down by a rock resting partly on their roots. They will then take nutrients directly from the water and will improve the water quality.
Certain aquatic plants are fast-growing. If your worried about a particular plant taking over in your pond, keep it contained in it's pot. Otherwise, they should be thinned out by removing the surplus plant. My ducks get a weekly feed out of my ponds and by doing this, they are removing surplus nutrients from the pond, aiding in the water quality. In time, you should also allow a thin layer of dead leaves to accumulate in the pond. This provides a larger surface area for useful nitrification bacteria and material for browsing by tadpoles.
Place some spreading garden plants such as Tassell Rush (Restio tetraphyllus), Spotted Knotweed (Persicaria decipiens) and Knobby Club Rush (Isolepisnodosa) around the pond edge as hiding places for frogs. Check out more plant suggestions from a recent blog post about Gails frog pond.

Nugget pumpkin

Hydrangeas
 If your potted hydrangea has been grown and raised at Wollongong wholesale nursery, it will be used to being outdoors as we grow them in full sun, so you can plant anytime. However, if you decide to plant during a hot summer, it would be wise to time your planting for early morning or late afternoon during the coolest part of the day. This will avoid heat stress. Also bear in mind that during the hotter months of the year, the plant will need to be kept well watered to establish in its new location.
 Hydrangeas actually do not change colours due to the presence or absence of a rusty nail or other rusting metal in the soil. Many hydrangeas may change their colour from pink to blue without having rusty nails buried in the roots of the plant. The colour of a hydrangea is a factor of the soil's pH and the amount of aluminium in the soil.
Popular types of basil include
There are two distinct papaya plant types: dioecious and gynodioecious.
What’s the secret to growing?
 These trees love the frost-free heat of the tropics and subtropics. Cold and frosty areas result in poor fruit set and death of the tree. For a successful crop, ensure you have a bisexual tree or otherwise you’ll need to grow both male and female trees.
It’s impossible to tell the sex of a plant until the tree starts to flower, so plant multiple seeds. When flowering commences at about 4-8 months, identify and cut the male trees off at ground level, leaving one female tree.

How do you tell a male from a female tree? The males typically grow clusters of flowers on long stalks. The females usually produce shorter stalks with individual flowers. Fruit develop sooner in hotter areas, but expect your first harvest 12 to 18 months after planting the seeds. Myself I have both male and female trees growing in my garden as they popped up from my compost bin. The funny thing is my house faces south and they have grown in my front garden with morning sun only and have defined all odds and fruit every year.
 My paw paws are sweet and delicious. I saved the seeds of my fruit for friends and now sharing the best qualities from my fruit. Now I have my own delicious fruit I would never buy from the supermarket again.
 Plant your paw paw in a warm, sheltered and well drained position. They can also be grown in large tubs and will often spring out of your compost heap from the kitchen scraps just like mine did.
Banana trees are fast growing perennials that need a lot of sunlight to grow well. Whether you plant the trees in the ground or in a container, make sure it will get light most of the day. Avoid shady areas at all costs.
Banana plants dislike:
Banana varieties
Lady Fingers are very tall and slender plants and have sweeter fruit.
Great, so now you know what to do once you have bananas growing in your garden, but how do you start? Banana plants are available at Wollongong Wholesale Nursery so take a look and don’t forget to join the garden club so that you can get a further 15% off most items.

Growing tips


Light-skinned
White Adriatic (Verdone, Adriatic) forms into a large tree. The fruit is a light greenish-yellow with an attractive deep-pink flesh. The flavor is excellent, the pulp being a light strawberry red. Performs well in warmer areas and is well suited to drying. The fruit matures in February and March.
(taken from Gardenate Website)
| Amaranth (also Love-lies-bleeding) | Plant in garden. | Harvest from May |
| Beetroot (also Beets) | Plant in garden. | Harvest from May |
| Broccoli | Start undercover in seed trays and plant out in 4-6 weeks. | Harvest from May |
| Brussels sprouts | Start undercover in seed trays and plant out in 4-6 weeks. | Harvest from June |
| Burdock (also Gobo (Japanese Burdock)) | Plant in garden. | Harvest from July |
| Carrot | Plant in garden. | Harvest from June |
| Cauliflower | Start undercover in seed trays and plant out in 4-6 weeks. | Harvest from July |
| Chives (also Garden chives) | Plant in garden. | Harvest from May |
| Collards (also Collard greens, Borekale) | Start undercover in seed trays and plant out in 4-6 weeks. | Harvest from May |
| Cucumber | Plant in garden. | Harvest from May |
| Dwarf beans (also French beans, Bush beans) | Plant in garden. | Harvest from May |
| Endive | Plant in garden. | Harvest from May |
| Florence Fennel (also Finocchio) | Plant in garden. | Harvest from June |
| Kohlrabi | Plant in garden. | Harvest from May |
| Leeks | Start undercover in seed trays and plant out in 4-6 weeks. | Harvest from July |
| Lettuce | Plant in garden. | Harvest from May |
| Mustard greens (also gai choy) | Plant in garden. | Harvest from April |
| Onion | Start undercover in seed trays and plant out in 4-6 weeks. | Harvest from September |
| Oregano (also Pot Marjoram) | Plant in garden. | Harvest from April |
| Parsley (also curly leaf parsley or flat leaf (Italian) parsley) | Plant in garden. | Harvest from May |
| Radish | Plant in garden. | Harvest from April |
| Rosella (also Queensland Jam Plant, Roselle) | Plant in garden. | Harvest from August |
| Salsify (also Vegetable oyster) | Plant in garden. | Harvest from June |
| Silverbeet (also Swiss Chard or Mangold) | Plant in garden. | Harvest from May |
| Swedes (also Rutabagas) | Plant in garden. | Harvest from May |
| Sweet corn (also maize) | Plant in garden. | Harvest from June |
| Turnip | Plant in garden. | Harvest from May |
*********************************
This list is from my garden as well as the four garden beds we have in garden class
Cucumbers
|
Corn
|
Chilies
|
Squash
|
Nugget pumpkins
|
Tomatoes
|
Marrow
|
Silverbeet
|
Strawberries
|
Zucchini
|
Parsley
|
Rhubarb
|
Beans
|
Capsicum
|
Radish
|
Oregano
|
Lemon balm
|
Beetroot
|
Lemongrass
|
Chard
|
Eggplant
|
Lettuce
|
Chives
|
Garlic
|
I hope your list is this big from your garden. The list can be endless for this month as you should all have so much and be sharing with family as well as friends.
Don't worry if you don't have much of a bounty from your garden. Your here to learn, and I'm here to teach you.. My first year students have come such a long way with their gardens; and you will too.
*********************************
Who’s listening in class?
I said I'd ask....Here's the first question for all my students.....
Who has purchased a garden diary for this year? If you have already; well done and thanks for listening.
I popped into David W’s garden last week unexpected, and rather early too. (sorry David)
After a great chat and a walk around his garden.... he has a fairly large garden that backs onto a reserve in Figtree so he is very lucky he also has purchased himself some native bee’s which I will talk about in class next month. But overall he has a wonderful designed garden that he looks after very well; as you can see by the below pictures.
 Look at those vegies and how perfect are his carrots? Well done David!
David’s native bee set up. Which I will be discussing in the next class.

This is David’s wood pile it’s great for hiding lizards as well as all those beneficial insects that love to live in decaying matter.


As you can see; nothing leaves David’s property. Everything is recycled, like this lovely rich leaf mulch.
Big thanks to David and his wife for allowing me to wonder around their garden; with a nice cup of coffee to finish off the visit.
*********************************
 Ginger (edible type)

Here in my garden I'm blessed to grow lovely Thai ginger. I can thank a good garden friend called Lilly for gifting me with a rhizome to plant. Thanks Lilly, my ginger grows so well, now I pass that gift on to others too.
Ginger loves a sheltered spot, filtered sunlight, warm weather, humidity, and rich, moist soil with plenty of organic matter. (What else did you expect from a tropical plant?)
The easiest way to get started growing ginger root is to get a few fresh rhizomes off someone who already has ginger growing in their garden. The best time to share it is when the plant is re-shooting (anywhere from early spring).
 |
| Edible Thai Ginger Shooting |
Make sure you select fresh, plump rhizomes.Look for pieces with well developed "eyes" or growth buds like potatoes. The buds look like little horns at the end of a piece or "finger")
Some people recommend soaking the rhizomes in water over night. Which is a great idea, since shop bought ginger might have been treated with chemicals that inhibit it to grow.
Whether you grow your ginger root in a pot or in the ground, you do need really good soil to start with. It needs to be organic enough to feed your ginger; it also needs to hold enough moisture so it doesn't dry out, but it needs to be free draining so the ginger roots don't become water logged and rot away. Once you have the right conditions, you won't be disappointed by the real thing.
Check out the lovely ginger that's flowering from Marie's garden. Well done Marie, that narrow strip down the side of your house is a fantastic spot for you ginger and tumeric.
Good compost is what I use; I mix one part of my best compost with one part of prepared garden soil. The compost supplies the nutrition and holds water, and the garden soil makes sure the mix drains freely. You can cut or break up the ginger rhizomes into little pieces with a couple of growing buds each. Or just plant the whole thing. Plant your ginger root five centimeters deep, with the growing buds facing up.
 |
| Marie's Ginger is flowering |
Good compost is what I use; I mix one part of my best compost with one part of prepared garden soil. The compost supplies the nutrition and holds water, and the garden soil makes sure the mix drains freely. You can cut or break up the ginger rhizomes into little pieces with a couple of growing buds each. Or just plant the whole thing. Plant your ginger root five centimeters deep, with the growing buds facing up.
Ginger needs a lot of moisture while actively growing. The soil should never dry out. Please don't over-water, as this water will take the nutrients with it as it runs off.
 |
| Marie's Ginger |
Here's the list of conditions that ginger needs:
- A sheltered place
- Plenty of moisture
- Plenty of nutrients
- Filtered sunlight
- Ginger usually needs little attention so how good is that
What ginger has to offer you?
- Ginger is a delicious spice to add to Asian dishes.
- Ginger is deliciously good for you
- Ginger tea is an excellent digestive aid and can be used to treat nausea or an upset stomach.
- Ginger can utilize space that is too shady for most other useful plants.
*********************************
Frogs
Attracting Frogs to Your Garden
Build a pond and they will come......

Having frogs in the garden is definitely a worthy goal: frogs will help keep down insect populations as well as serenade you with their songs. However, the best way to share your garden with frogs is to simply build a frog-friendly pond.
Build a pond and they will come......

Having frogs in the garden is definitely a worthy goal: frogs will help keep down insect populations as well as serenade you with their songs. However, the best way to share your garden with frogs is to simply build a frog-friendly pond.
Re-creating their natural habitat is the best way to attract frogs (toads are good too) and keep them from wandering off in search of more frog-friendly surroundings. Keep in mind, if you live in an area or climate where frogs are not often seen, the chances of attracting frogs is obviously slim. However, in these areas, bringing in frogs is not likely to work either, because frogs do not naturally thrive in those conditions.
How to Attract Frogs
The best way to attract frogs is to find out what kind of habitat your native frogs like and try to recreate that habitat in your garden.
- Easy Access to the Water. A pond with sloped sides is necessary to allow the frogs to easily get in and out of the pond. Using a flexible pond liner to build a frog pond that gradually slopes from shallow to deep is best. A pre-formed plastic liner can be used but you must place rocks or other items in the water in such a way as to make a ramp for the frogs to get in and out. The pond does not have to be overly large, though.
- Skip the Aeration, Filtration and Water Falls. Frogs like quiet, still water.
- No Fish. Fish are natural predators of frogs, especially eggs and tadpoles.
- Add Plants In and Around the Pond. A variety of water plants such as water lilies help to provide cover, shade and a more natural environment. Likewise, provide plants around the pond for shelter and shade (ferns, dracaena’s or cordylines, etc.). In addition, let some ground covers grow wild around the pond for extra cover. The plants in and around the pond will attract insects and other organisms that frogs feed on. native plants are best -- check with your Wollongong Wholesale Nursery for advice.
- Don't keep it Too Clean. Remember most natural ponds are not sparkling clean. Organic matter in the water helps create natural conditions and feeds the natural prey for the frogs. Algae in the pond also nourishes tadpoles.
- Provide Extra Shelter. Place a couple of clay plant pots, on their side and partly buried, to provide extra shelter and shade. Remember frogs like it damp and cool, and also need places to hide from predators.
- Keep it Chemical Free. Frogs are very sensitive to pollutants and you do not want to use garden chemicals in your garden that might ultimately hurt the frogs.

Patience!
Once you have built the perfect pond, it may take a while for it to become well-established and for local frogs to move in. Resist the temptation to catch frogs to put in your pond, as adult frogs have established a home and may try to return to it.
We all know the rules do not bring tadpoles home and release them as the local wildlife rangers are against this. Just be patient and they will eventually move in.
Planting around a frog pond.
Add plenty of emergent swamp plants, including those that will look green and fresh in winter, such as Water lilies, Azolla and Duck weed (Spirodela pusilla).Water lilies in a sunny position provide cover and help discourage marauding birds and algae blooms. Swamp plants can be grown bare-rooted, held down by a rock resting partly on their roots. They will then take nutrients directly from the water and will improve the water quality.
Certain aquatic plants are fast-growing. If your worried about a particular plant taking over in your pond, keep it contained in it's pot. Otherwise, they should be thinned out by removing the surplus plant. My ducks get a weekly feed out of my ponds and by doing this, they are removing surplus nutrients from the pond, aiding in the water quality. In time, you should also allow a thin layer of dead leaves to accumulate in the pond. This provides a larger surface area for useful nitrification bacteria and material for browsing by tadpoles.
Place some spreading garden plants such as Tassell Rush (Restio tetraphyllus), Spotted Knotweed (Persicaria decipiens) and Knobby Club Rush (Isolepisnodosa) around the pond edge as hiding places for frogs. Check out more plant suggestions from a recent blog post about Gails frog pond.
*********************************
Time to revisit those vegie beds ( no dig beds)
Time to revisit those vegie beds ( no dig beds)
It's time to have a good look around our vegie gardens and see what's happening. Remove what has gone to seed, and replenish with new plants. I cannot believe how much produce has been harvested from my vegie beds recently.
Squash

Nugget pumpkin

*********************************
It's time to be thinking about your Winter garden....
Your garden has done you well over the summer, and it's time to begin thinking and planning your winter crop which we'll soon be looking at planting. Let’s start saving seeds from the summer crops as you can see by this picture the seeds are ready to collect.
 |
| Seed ready to harvest |
*********************************
Summer wouldn’t be the same without these plants it’s a bit like summer without agapanthus, lots of colour everywhere.
Hydrangeas are a popular flowering plant for many gardeners – with their stunning flowers and foliage, these hardy plants are a great addition to any garden.
They flower in summer and can be cut back in winter or grown from cuttings. The colour is an indication of the pH value of your soil. Pink flowers indicate it is alkaline (pH of between 8 and 12) and blue flowers mean the soil is more acidic (pH of between 1 and 6 with 7 being neutral). White hydrangea flowers may change colour as they mature.

Where to Plant Hydrangeas

Where to Plant Hydrangeas
Location: Although hydrangeas are pretty hardy flowers, they can suffer in full summer sun or windy conditions that dry them out quickly. They prefer a partially shaded area or one that receives only morning sun. So, the best location is partially shaded or ‘dappled’ shade. All varieties will bloom and grow well in a morning sun/afternoon shade location but not in heavy shade. Try the southern side of your garden. Avoid planting under a tree. Tree roots will compete for the rich moist soil around the plant and there may be insufficient light if the tree canopy is large.
Drainage: You will also need to consider their drainage requirements because whilst they like moist, compost rich well-drained soil, they hate ‘wet feet’! Just like me, there is nothing worse than wrinkly toes. Raised beds are a good option if these are available or even a mounded position.
When to Plant Hydrangeas
 If your potted hydrangea has been grown and raised at Wollongong wholesale nursery, it will be used to being outdoors as we grow them in full sun, so you can plant anytime. However, if you decide to plant during a hot summer, it would be wise to time your planting for early morning or late afternoon during the coolest part of the day. This will avoid heat stress. Also bear in mind that during the hotter months of the year, the plant will need to be kept well watered to establish in its new location.
Hydrangeas love compost – it is full of nutrients, helps retain moisture and builds the organic matter in your soil. This in turn attracts worms that aerate it with their tunnels and leave you a trail of rich humus for free. Wonderful garden helpers! If you have your own homemade compost, then use that as a preference. If not, then choose a certified organic compost like mushroom compost as this is probably the next best available alternative. If you have additional soil improvers on hand such as chicken or cow manure, Epsom Salts (magnesium sulphate), sugarcane mulch, worm castings, chopped banana peel or any other manure you find – these can all add valuable minerals and nutrients to the soil that will boost your plant growth.

Mulch well – Because their fibrous root system is close to the soil surface, it is important to mulch well. I prefer to use a ‘feeding’ mulch which breaks down to add more organic matter to the soil – mulches such as sugarcane, hay, lucerne, pea straw, grassy mulch hay, even grass clippings (no seed heads!) will all add valuable nutrients to the soil while protecting your hydrangea from losing too much moisture from the soil.
All these mulches are available at Wollongong Wholesale Nursery so take a look and don’t forget to join the garden club so that you can get a further 15% off most items .
Watering, Fertilising & Maintenance
To establish your hydrangea, water in well.
On hot summer days, water well in the morning so the plant won’t wilt during the heat of the day.
When in flower, water deeply twice a week.
Water deeply every 3 days rather than a shallow water daily or when it is noticeably dry. This encourages deep root development. You can water with Epsom salts (1 tablespoon to a 9L watering can) monthly. This is a big bonus to the hydrangeas.
As a rule of thumb, it is better to underwater rather than over water! They will ‘tell’ you they need a drink by wilting a little.
In winter, cut off all the flower heads that has finished blooming to a double bud. This will help them bloom beautifully the next year.
Hydrangeas have a reputation as the chameleons of the garden. These shrubs produce flowers that may bloom in shades of blue or pink. According to old wives tales, all it takes to change a hydrangea's colour to blue is to bury a rusty nail in among the roots.I remember my dad doing this to his every year and they were beautiful but.....
Misconceptions
 Hydrangeas actually do not change colours due to the presence or absence of a rusty nail or other rusting metal in the soil. Many hydrangeas may change their colour from pink to blue without having rusty nails buried in the roots of the plant. The colour of a hydrangea is a factor of the soil's pH and the amount of aluminium in the soil.
Considerations
Gardeners who cut themselves on these long-buried rusty metal pieces may have to get a tetanus shot. So before you bury nails or other pieces of tin in your garden to change the pH of your soil, consider alternative solutions. You can achieve the same effect by adding aluminum sulfate. Aluminum sulfate will lower the pH without adding the danger that sharp or rusty pieces of metal can bring to a garden.
*********************************
Basil
Growing Basil is relatively easy as long as the growing environment has suitable light and temperature levels.
Basil is grown for its fragrant tasty leaves that can be added raw to salads, sandwiches or used in cooked dishes such as the ever popular pasta with tomato and basil sauce.
Basil likes a fertile soil that has been well dug to allow good soil air circulation. Introducing well-rotted organic compost or manure into the soil a month or so before sowing will help this.

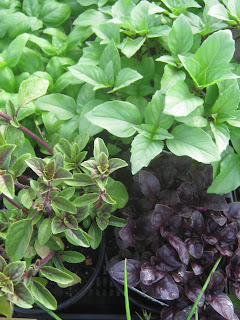


Popular types of basil include
•Sweet Basil: The familiar green variety used in pesto and tomato dishes.
•Cinnamon Basil: Purple flowers and a spicy, cinnamon flavour.
•Thai Basil: This type has a flavour tinged with citrus.
•Purple Basil: As the name implies, it has purple leaves and makes a dramatic addition to flower beds.
Growing Conditions
- Where to Plant: Choose a sunny, sheltered spot protected from chilly winds and temperature extremes.
- Light Requirements: Full sun (6-8 hours per day).
- Soil Requirements: Rich soil that drains well but also holds moisture.
- Time Early spring right through to late summer.
- Size of Plants: Varies, but usually 30 to 45cms depending on type. There are also dwarf varieties that work well in containers.
- Spacing of Plants: 30 to 50cms apart.
Growing Tips
- Planting: Mix in plenty of organic matter about a 30cms deep, to hold moisture while improving drainage.
- Water: Basil likes soil that is moist but not soggy. Water regularly, but don’t allow the soil to become soggy. When watering, try not to splash water onto the leaves.
- Fertilizer: In good, rich soil, basil doesn't need to be fertilized, although it will benefit from applications of compost and compost tea.
- Mulch: Basil doesn't like competition, so mulch around plants to suppress competing weeds while helping to hold in moisture.
- Heat and Drought: Basil will quickly “go to seed” when stressed by heat or drought, which results in a loss of flavor Stressed plants will bloom and become tough and spindly. If your plants are stressed, they may need more water or some protection during the hottest part of the day.
- Frost Protection: Even a light frost will mean the end of basil season! Unless you plant the perennial type this one grows most of the year.
Basil is one of the most versatile herbs, which can give you big yields in sunny summer weather. The plant’s leaves are the main component of the flavourful pesto sauce and are used fresh in salads, sandwiches, and many other recipes. The fresh leaves are used all during the growing season but the plant will die back as soon as temperatures begin to cool. Drying basil is an easy way to save the delicious leaves and provide you with that summer taste even in winter.
How to Dry Fresh Basil
Dry basil has a more intense flavour when it is fresh but it degrades quickly. Dried herbs are generally 3 to 4 times stronger than the fresh herb. The leaves have high moisture content and need to dry quickly to prevent moulding. Air has to circulate freely around both sides of the leaf for the fastest drying. Drying fresh basil is an easy way to preserve the fresh lemony-anise to spicy-pepper flavour of the herb.
The first step in how to dry fresh basil is the harvesting. Herbs that are harvested for drying should be harvested in the morning just after the dew has air-dried. Cut the herbs from the plant before it gets too hot. Remove the stems back to 5cms above a growth node. This will allow more leaves to flush at the cut point. Harvest more than you would use fresh when drying basil, because the leaves will reduce in size by more than half.
There are a few quick and effective methods of drying basil. You can cut stems around 15cms long and bind them together in small bunches to hang dry. Place a paper bag around the bundles, which has holes punched in it. Hang the drying basil in a dimly lit to dark room with low humidity and warm temperatures. The bag will catch dry bits of the leaves as they fall off. You can also dry basil in a food dehydrator. Lay each leaf in a single layer on the racks and allow them to dry in the machine until completely crisp.
A super-fast method of drying basil uses the microwave. Use caution to prevent the herbs from scorching. Lay the leaves in a single layer on paper towels and microwave on low for up to 3 minutes. Check them every minute and remove any that are dry to prevent burning.
You can also chop Basil to the size you use it, and preserve it fresh in ice-cube trays like I've done here. Simply put roughly a tablespoon of chopped Basil in each cube, top it up with water and freeze. Don't forget to put a label in one of the cubes (under water too)...That way, when you go to decant the frozen cubes into a bag, you already have it labelled.
Beware: once frozen, many herbs look alike....lol.

Soil preparation is the first step of creating a wonderful garden. Good soil provides the basis for seed germination and for the quantity and quality of the crop. The best soil is a crumbly loam, which is easy to work, fertile, well drained, with a high content of organic matter, free of stones, moisture retentive and deep. Such perfect soil is rather rare, but with careful use of different amendments you can improve almost any type of soil and give your herbs and vegetables a good start.
You can also chop Basil to the size you use it, and preserve it fresh in ice-cube trays like I've done here. Simply put roughly a tablespoon of chopped Basil in each cube, top it up with water and freeze. Don't forget to put a label in one of the cubes (under water too)...That way, when you go to decant the frozen cubes into a bag, you already have it labelled.
Beware: once frozen, many herbs look alike....lol.
If you've been using the same area for your garden for several years, the only thing that needs to be done is to dig in additional organic material and fertilizers
*********************************
Paw Paws, papaya
About the plant
The papaya is a soft-wooded, perennial plant that lives for about five years, though commercial plantations are usually replanted sooner. It normally grows as a single stem up to 4 m high. A crown of large palmate leaves at the top of the stem grows directly from the trunk.
The plant starts to flower five to eight months from planting and the fruit is ready to harvest five to six months after that. The plants grow fastest in warmer climates with good growing conditions. The fruit form in the leaf axils and hang on the tree after the leaves fall. Commercial harvesting continues for about two years until the trees become too tall to pick easily or tree losses become a problem.
 |
| Bisexual Papaya Plants Available at Wollongong Wholesale Nursery |
Dioecious papayas have male and female flowers on different plants. This means that both male and female plants are needed for fruit production
Gynodioecious papayas, more commonly called bisexual lines, have trees that can be female or bisexual. Bisexual flowers have both male and female parts within the same flower and can be self-pollinated.
These Bisexual Papaya are available at Wollongong Wholesale Nursery so take a look and don’t forget to join the garden club so that you can get a further 15% off most items.
These Bisexual Papaya are available at Wollongong Wholesale Nursery so take a look and don’t forget to join the garden club so that you can get a further 15% off most items.
What’s the secret to growing?
 These trees love the frost-free heat of the tropics and subtropics. Cold and frosty areas result in poor fruit set and death of the tree. For a successful crop, ensure you have a bisexual tree or otherwise you’ll need to grow both male and female trees.
 It’s impossible to tell the sex of a plant until the tree starts to flower, so plant multiple seeds. When flowering commences at about 4-8 months, identify and cut the male trees off at ground level, leaving one female tree.
 | |
|

 |
| Paw Paw, the female flower and fruit |

Choosing the spot
 Plant your paw paw in a warm, sheltered and well drained position. They can also be grown in large tubs and will often spring out of your compost heap from the kitchen scraps just like mine did.
Prolific fruit production means a hungry plant. Enrich the soil with plenty of compost and animal manure.
If your soils tend to be heavy clay or waterlogged in summer, plant the seed on a raised mound to ensure perfect drainage.
If your soils tend to be heavy clay or waterlogged in summer, plant the seed on a raised mound to ensure perfect drainage.
Care and maintenance
Fertilize your tree with an all-purpose organic fruit tree fertiliser 2-3 monthly in warm weather. If immature fruit drop off, add a little organic potash and boron to the fertilising regime.
Paw paw crinkle virus seen as wrinkled mature leaves will kill the plant. If this is evident, either remove the plant completely or try a rescue remedy by cutting back the tree to half its size and fertilizing well. For black spots that appear on the fruit in humid and wet weather, spray with an organic Copper -based fungicide spray.
From garden to table
Pawpaw and papaya are excellent eaten either green or fully ripe. Green papaya salad from grated green fruits, combined it with lime, chilli and fish sauce is delicious. Green fruit can also be skewered with fish or meat on barbecues or added to curries. Leaves and flesh are used as meat tenderisers for the even toughest cuts.
Paw paws are now available at Wollongong Wholesale Nursery
*********************************
Bananas
Bananas
 |
| Banana's from Jean & Graham's Garden |
Growing bananas does not take much effort, but it does require that you get a few things right when you first get started.
Banana plants can offer many benefits
- They make great windbreaks or screens
- They can keep the sun off the hot western side of your house
- They utilize the water and nutrients in waste drains (think about the washing water or outdoor shower),
- The leaves can be fed to horses, cows and other grazers
- The dried remains of the trunks can be used for weaving baskets and mats.
- And... they give you bananas. Lots of bananas! ( you may even go banana’s once you realize how easy they are to grow)
But when I look around at other people’s gardens; I see some pretty sad looking banana plants growing. You do need to look after them...but they will reward you tenfold.
Banana plants like:
- Rich, dark, fertile soils
- Lots of mulch and organic matter. LOTS! Just keep piling it on
- Lots of nitrogen and potassium. (Chicken manure!)
- Steady warmth, not too hot and not too cold. (Bananas are sissies when it comes to temperatures...)
- Steady moisture, in the ground and in the air
- The shelter of other bananas! That's the most overlooked aspect by home growers...
Banana plants dislike:
- Strong winds...that's why they strip their leaves; it's a defense mechanism
- Extreme heat or cold
- Being hungry or thirsty
- Being alone and exposed (that’s why they are grown in fields)
Banana varieties
Cavendish is the variety that you know from the shops. It's a stout variety that produces large heavy bunches.
Lady Fingers are very tall and slender plants and have sweeter fruit.

Bananas aren't real trees, not even palm trees, even though they are often called banana palms.
Bananas are perennial herbs.
(Gingers, heliconias and bird-of-paradise flowers are distant relatives of bananas. They are in the same order, Zingiberales.)
Bananas are perennial herbs.
(Gingers, heliconias and bird-of-paradise flowers are distant relatives of bananas. They are in the same order, Zingiberales.)
Banana trunks consists of all the leaf stalks wrapped around each other. New leaves start growing inside, below the ground. They push up through the middle and emerge from the center of the crown.
So does the flower, which finally turns into a bunch of bananas.
So does the flower, which finally turns into a bunch of bananas.
A banana plant takes about 9 months to grow up and produce a bunch of bananas.
Then the mother plant dies. But around the base of it are many suckers, little baby plants.
Then the mother plant dies. But around the base of it are many suckers, little baby plants.
At the base of a banana plant, under the ground, is a big rhizome, called the corm.
The corm has growing points and they turn into new suckers. These suckers can be taken off and transplanted, and one or two can be left in position to replace the mother plant.
Great, so now you know what to do once you have bananas growing in your garden, but how do you start? Banana plants are available at Wollongong Wholesale Nursery so take a look and don’t forget to join the garden club so that you can get a further 15% off most items.
The ideal temperature range for banana growing is around 26-30°C (78-86F).
You need a lot of water to grow bananas. The huge soft leaves evaporate a lot, and you have to keep up the supply. Bananas also need high humidity to be happy.
You need very rich soil. If you don't have good soil to start with, make some. Incorporate lots and lots of compost and plenty of chicken manure before you plant your bananas (wood ash for extra potassium doesn't hurt either), and then mulch them very thickly. And keep mulching and feeding them!
And you need room so you can plant enough of them together. Bananas need shelter from wind. Growing many banana plants together increases the humidity in the middle, evens out temperature changes a bit, and it shades and cools the trunks. (You don't want to cook the flower that's forming in the middle...)
You may see your first flower emerge after about six months, depending on the weather. Leave the leaves around it, especially the one protecting the top bend of the stalk from sunburn! As the purple flower petals curl back and drop off they reveal a "hand" of bananas under each. Each banana is a "finger".
You may get anything between four to a dozen or more full hands. The male fingers just dry and drop off. Only the stalk remains. If you let it grow it will eventually reach the ground.
Bananas are ready to be picked when they look well rounded with ribs, and the little flowers at the end are dry and rub off easily.

They will eventually ripen on the bunch, and those bananas taste the best. But they will start to ripen very quickly, faster than you can eat or use them. So you may as well cut the top hands off a bit earlier and ripen them on the kitchen bench.
You can also cut the whole bunch and hang it somewhere if you need to protect it from possums or birds or other thieves. But then all bananas will ripen at once! So be prepared.
*********************************
Growing Figs
Growing tips

A fig tree will succeed best in a sheltered position in full sun. A south or south-west facing wall is ideal for growing and training a fan-shaped fig - use horizontal wires fixed to the wall 45cm apart.
It is essential that the roots are contained and not allowed to spread. Left to its own devices, the tree will make vigorous growth at the expense of a good crop of fruit. There are two ways to restrict the root run.
Grow the tree in a 45cm diameter pot of soil-based compost. Keep the top of the soil 7cm-10cm below the rim of the pot to allow an annual spring top-up with compost, as well as to facilitate watering and feeding. Either plunge the pot into the soil against the wall or keep it above ground. That way, you have the advantage of being able to move it to a sheltered spot during severe weather.
Alternatively, plant into the soil at the base of the wall where the root run is restricted to a planting pit that is 60cm by 60cm and 60cm deep. Dig the hole directly in front of the wall, bearing in mind that it involves a lot of digging and several barrow-loads of soil.
Fill the pot or planting hole with soil-based compost or sterilised topsoil with a layer of well-rotted fowl manure or compost in the base, and plant the fig at the same depth as previously grown.
With the roots of the fig confined to a small area it will be essential to water the tree, especially during summer when the fruit is swelling and remember to net the tree early, to prevent birds stealing the crop. The figs are ready to pick when the fruit droops on its stalk and the skin is well colored If the skin cracks open it is fully ripe and you may notice a drop of nectar.

Dark skinned
Brown Turkey This variety is highly recommended due to its long ripening season compared to the other varieties. The good quality fruit is recommended for fresh eating in contrast to drying or preserving. The fruits are medium sized with thin, tough brown skin tinged with purple. The pulp is a rosy pink with a rich flavor Fruit is harvested during February, March and April.

Black Genoa is a large sized fig with purple skin and dark red flesh. The flavor is very rich and sweet with fair quality. The fruit is best suited for fresh eating. This is a very vigorous and productive variety that is often seen growing commercially due to its high yields. The Black Genoa matures slightly earlier than Brown Turkey.

Black Genoa is a large sized fig with purple skin and dark red flesh. The flavor is very rich and sweet with fair quality. The fruit is best suited for fresh eating. This is a very vigorous and productive variety that is often seen growing commercially due to its high yields. The Black Genoa matures slightly earlier than Brown Turkey.

Light-skinned
White Adriatic (Verdone, Adriatic) forms into a large tree. The fruit is a light greenish-yellow with an attractive deep-pink flesh. The flavor is excellent, the pulp being a light strawberry red. Performs well in warmer areas and is well suited to drying. The fruit matures in February and March.
Excel is a medium to large fruit with light greenish-yellow skin. The pulp is a light amber with a high sugar content. It is excellent for fresh fruit, preserving or drying. Highly recommended due to its virtual non-splitting. Superb. Harvested early February.

Prestons Prolific Very thick flesh, creamy white and juicy, with sweet flavour. Extremely vigorous and late cropping. Harvested February to March.

Prestons Prolific Very thick flesh, creamy white and juicy, with sweet flavour. Extremely vigorous and late cropping. Harvested February to March.
*********************************
What’s on the list to propagate this month?
Cuttings
Ornamental Sweet Potato Vine Propagation by Cuttings
1: Take a cutting from a sweet potato vine that is at least 10cms long. Really long sweet potato vines could be cut in half.
2: Remove all the leaves on the vine leaving only a couple at the tip so the cutting can complete photosynthesis. The lower leaves will likely die on their own if you don't remove them because there aren't any roots to feed them, but just remove them anyway to avoid having to pick them up as the fall off.
3: You can place your cuttings in potting soil or water. I like to put my ornamental sweet potato vine cuttings in water because they seem to root faster and I can observe the root growth. Place the cutting in a warm and bright place out of direct sunlight. Make sure that most, if not all, of the leaf node are submerged in water. Roots will start to form along the "bumps" at the leaf node within a couple of days. If you like you can plant straight into a pot in a good seed raising mix.
Propagating your ornamental sweet potato vines is really easy and you don't need any special rooting powders to do so. Within a couple of days you've created a whole new lot of plants. Please note you can only grow these plants for your own needs and not to sell as it’s against the law to do so.
If your sweet potato vine is already potted you can bring it indoors and treat it as a houseplant. The tubers of ornamental sweet potatoes can also be lifted, cleaned off and stored indoors in a cool and dry location in your home and planted out in the garden again in the spring.


*********************************
Hydrangea’s from summer cuttings
Hydrangeas are fairly easy to root. Some people have rooted them in water,but I like to pot mine straight up.
ROOTING CUTTINGS IN FIVE EASY STEPS
Take a cutting from a branch of the hydrangea shrub about 10 to 15cms long. Most experts say the cutting will work best if taken from a branch that did not flower this year and I agree with that.
Remove the lower leaves of the bottom two leaf nodes
Cut largest leaves down to about half their size
Dip cuttings in rooting hormone (this is entirely optional) and insert into damp seed plug mix which I recommend all the time.
Water pot well and allow to drain. Make sure soil is moist but not soggy. Place cuttings in a hot house for a week or two and they should be ready after that.
Basil from summer cuttings
When trimming your Perennial Basil, this is the best time to propagate the plant to share it out with other gardeners; and there's a few ways to do this too.....


OR you could place a few cuttings in a glass jar on the kitchen window sill and watch the roots grow before your eyes....You will be amazed how quickly Perennial Basil begins to shoot using this method.

Once the roots are well established, simply pot into individual pots and tend until the roots reach the base of the pot....Then plant into the garden or share out with friends, family and other gardeners. Remember your local community garden too...They will always be happy to take spare plants if you can't find new homes for them.
*********************************
Basil from summer cuttings
When trimming your Perennial Basil, this is the best time to propagate the plant to share it out with other gardeners; and there's a few ways to do this too.....
1. Trim your Perennial Basil back to a nice shape, trim off any seed heads....and place cuttings into one pot....usually about 12 cuttings to one 8cm pot is good. This gives the cuttings good 'competition' to reproduce and start new root growth beneath the soil. In no time you will be able to split the cuttings into their own pot and share them out. Too easy.


OR you could place a few cuttings in a glass jar on the kitchen window sill and watch the roots grow before your eyes....You will be amazed how quickly Perennial Basil begins to shoot using this method.
Once the roots are well established, simply pot into individual pots and tend until the roots reach the base of the pot....Then plant into the garden or share out with friends, family and other gardeners. Remember your local community garden too...They will always be happy to take spare plants if you can't find new homes for them.
*********************************
No comments:
Post a Comment
Hi there...Thanks for reading Blooming Gardens. We love to receive comments on the blog....and we look forward to every one of them.